12.1: Load and display data fetched from a content provider
Contents:
- What you should already KNOW
- What you will LEARN
- What you will DO
- App overview
- Task 1. Create the base app for WordListLoader
- Task 2: MainActivity: Adding a LoaderManager and LoaderCallbacks
- Task 3: WordListAdapter: Implement setData(), getItemCount(), and onBindViewHolder()
- Summary
- Related concept
- Learn more
In this practical you will learn how to load data provided by another app's content provider in the background and display it to the user, when it is ready.
Asking a ContentProvider for data you want to display may take time. If you request data from the content provider from an Activity (and run it on the UI thread), the app may get blocked long enough to cause a visible delay for the user, and the system may even issue an "Application Not Responding" message. Therefore, you should load data on a separate thread, in the background, and display the results after loading is finished.
To run a query on a separate thread, you use loader that runs asynchronously in the background and reconnects to the Activity when finished. Specifically, CursorLoader runs a query in the background, and automatically re-runs it when data associated with the query changes.
You have used an AsyncTaskLoader in a previous practical. CursorLoader extends AsyncTaskLoader to work with content providers.
At a high level, you need the following pieces to use a loader to display data from a content provider:
- An Activity or fragment.
- An instance of the LoaderManager in the Activity.
- A CursorLoader to load data backed by a ContentProvider.
- An implementation for LoaderManager.LoaderCallbacks, an abstract callback interface for the client to interact with the LoaderManager.
- A way of displaying the loader's data, commonly using an adapter. For example, you could display the data in a RecyclerView.
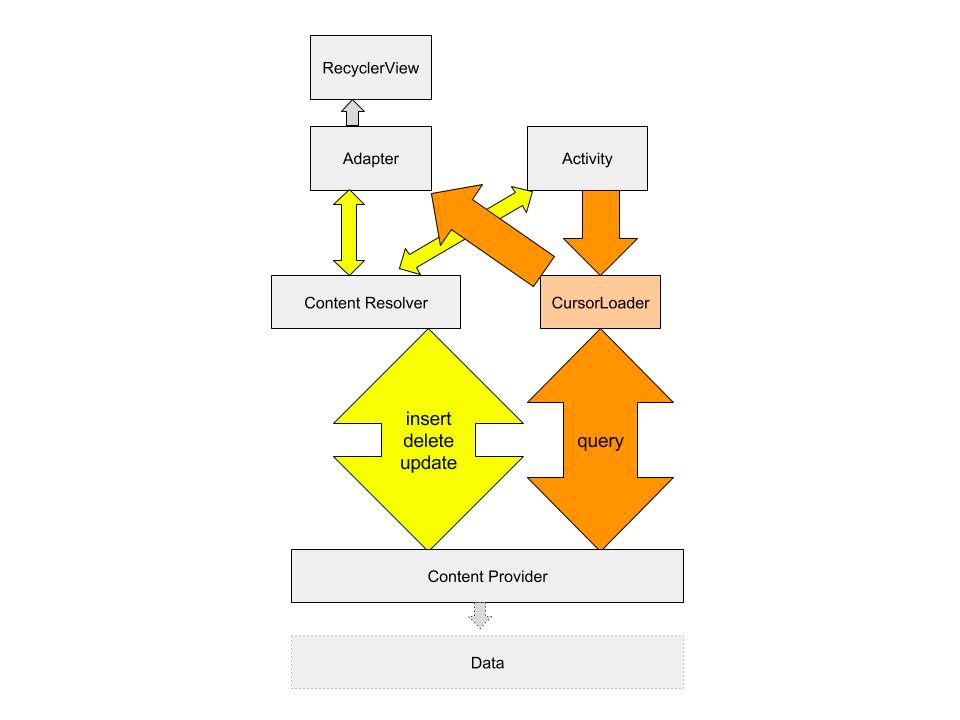
The following diagram shows a complete app architecture with a loader.
- The loader performs querying for items in the background. If the data changes, it automatically gets a new set of data for the adapter.
- The insert, delete, and update operations do not use the loader. However, after the data changes because of an insert, delete, or update operation, the loader fetches the updated data and notifies the adapter.

What you should already KNOW
For this practical you should be able to:
- Display data in a RecyclerView.
- Work with simple Adapters.
- Understand Cursors (see previous practical and concepts).
- Work with AsyncTaskLoader.
- Understand how to work with a Content Providers.
What you will LEARN
You will learn to:
- Load data from a content provider using a CursorLoader.
- Use code from a finished app to quickly build a new app with related functionality.
What you will DO
- You will create a basic app that uses a CursorLoader to query the content provider of WordListSQLWithContentProvider and display the data in a RecyclerView.
- Use WordListClient as a reference for some of the code. In particular, you can reuse the Contract and WordItem Classes, as well as parts of the MainActivity and WordListAdapter classes.
- The app you will create will have a very basic UI. Unlike WordListClient, it will not have insert, delete, or update functionality.
App Overview
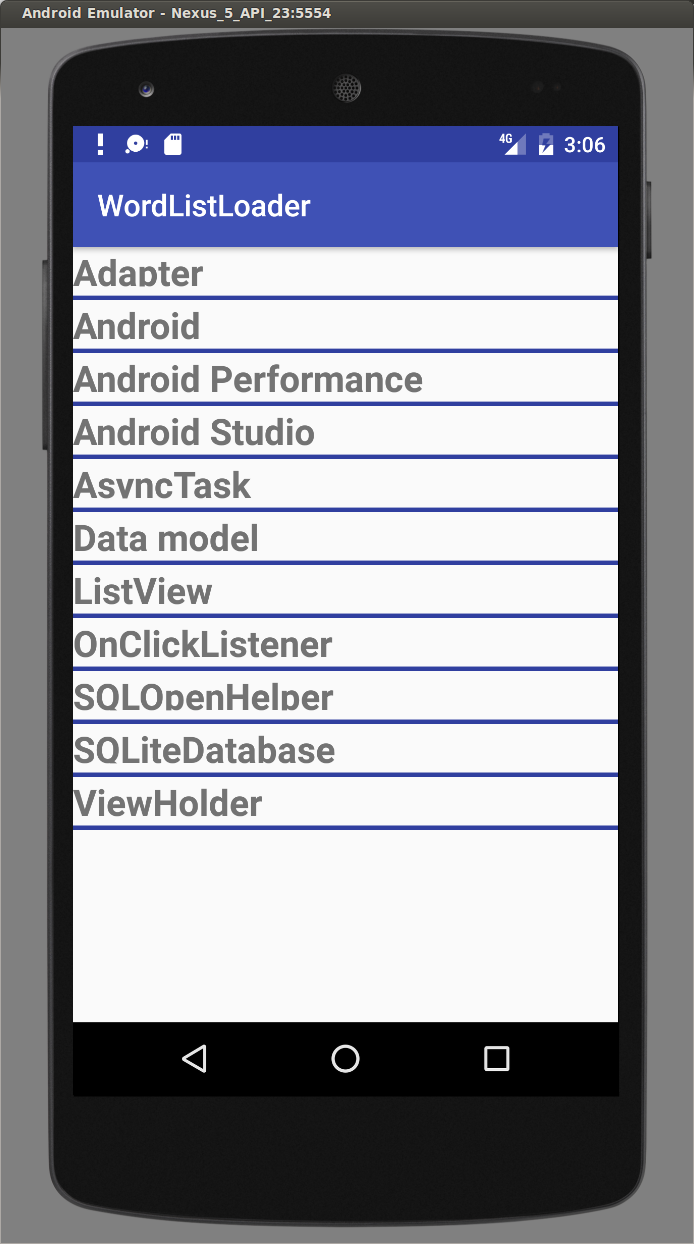
Using WordListClient from the previous practical as a source for some of the code, you will create a new app, WordListLoader that loads and displays data from the content provider for WordListSQLWithContentProvider. The following screenshot shows how the finished app will display the words.

- You must install a WordListWithContentProvider app that shares its content provider so that there is a content provider available for WordListLoader.
- Use the WordListClient app that you built in the previous practical as a reference and to reuse code.
Task 1. Create the base app for WordListLoader
In this task you will create a project and parts of the app that are not specific to loaders. You need the WordListClient app loaded in Android Studio, so you can copy code from it.
1.1 Create a project with Contract and WordListItem classes and layout files
- Start Android Studio and load the finished WordListClient app from the previous practical.
- Create a new project with the Empty Activity template and call it WordListLoader.
- Add the permission for WordListSQLWithContentProvider's content provider to the Android Manifest.
<uses-permission android:name = "com.android.example.wordlistsqlwithcontentprovider.PERMISSION"/> - Create a new Java class and call it Contract.
- Copy the Contract class from WordListClient into the new Contract class of WordListLoader. Make sure not to copy the package name.
- In WordListLoader, create a new Java class and call it WordListItem.
- Copy the WordItem class from WordListClient into the new WordItem class of WordListLoader.
- Copy the layout for the recycler view from actity_main.xml from WordListClient to WordListLoader. Remove the floating action button.
- Create a new layout for WordListItem, wordlist_item.xml.
- Using wordlist_item.xml from WordListClient as your reference, create a LinearLayout with a single TextView.
- The id of the TextView must be
android:id="@+id/word". - Resolve strings, dimensions, and styles that you are reusing. Note that you can copy/paste files between projects. Overwrite the existing XML files in WordListLoader.
- Change the app_name to WordListLoader in strings.xml.
- The id of the TextView must be
- At this point, you should see no errors in Android Studio.
1.2 Add a RecyclerView to MainActivity
To display the data, add a RecyclerView to your MainActivity. You can do this on your own, or reuse code from WordListClient.
- Add the RecyclerView and Coordinator Layout from the support library to your build.gradle file.
compile 'com.android.support:recyclerview-v7:24.1.1' compile 'com.android.support:design:24.1.1' - Import the support library versions of RecyclerView and LinearLayoutManager into your MainActivity.
import android.support.v7.widget.LinearLayoutManager; import android.support.v7.widget.RecyclerView; - Create a TAG for MainActivity.
- Create a private variable mRecyclerView for the RecyclerView.
- Create a private variable mWordListAdapter for the adapter. This will remain red, until you create the adapter class.
- In onCreate() of MainActivity, create a RecyclerView, create a WordListAdapter, set the adapter on the Recyclerview, and attach a LinearLayoutManger. See WordListClient for sample code.
// Create recycler view. mRecyclerView = (RecyclerView) findViewById(R.id.recyclerview); // Create an adapter and supply the data to be displayed. mAdapter = new WordListAdapter(this); // Connect the adapter with the recycler view. mRecyclerView.setAdapter(mAdapter); // Give the recycler view a default layout manager. mRecyclerView.setLayoutManager(new LinearLayoutManager(this)); - If you build your app now, only WordListAdapter should be red. The app does not run yet.
1.3 Create WordListAdapter
Use WorldListAdapter from WordListClient and the snippets below as a reference for creating this adapter. If you need a refresher, revisit the RecyclerView chapter of this course.
Create a new Java class WordListAdapter that extends Recyclerview.Adapter.
public class WordListAdapter
extends RecyclerView.Adapter<WordListAdapter.WordViewHolder>   {}
Using WordListAdapter as a reference, add the following:
Add an inner ViewHolder class with one TextView, called wordItemView and inflate it from the text view with the id "word".
class WordViewHolder extends RecyclerView.ViewHolder { public final TextView wordItemView; public WordViewHolder(View itemView) { super(itemView); wordItemView = (TextView) itemView.findViewById(word); } }- Add a TAG for log messages.
private static final String TAG = WordListAdapter.class.getSimpleName(); - Add member variables for the LayoutInflator and the context.
private final LayoutInflater mInflater; private Context mContext; - Implement the constructor for WordListAdapter.
public WordListAdapter(Context context) { mInflater = LayoutInflater.from(context); this.mContext = context; } - Implement (or copy) the onCreateViewHolder method to inflate a wordlist_item view.
@Override public WordViewHolder onCreateViewHolder( ViewGroup parent, int viewType) { View mItemView = mInflater.inflate( R.layout.wordlist_item, parent, false); return new WordViewHolder(mItemView); } - Press Alt-Enter on the adapter's class header and "choose implement methods" to create method stubs for the
getItemCount()andonBindViewHolder()methods. - At this point, there should be no red underlines or words in your code.
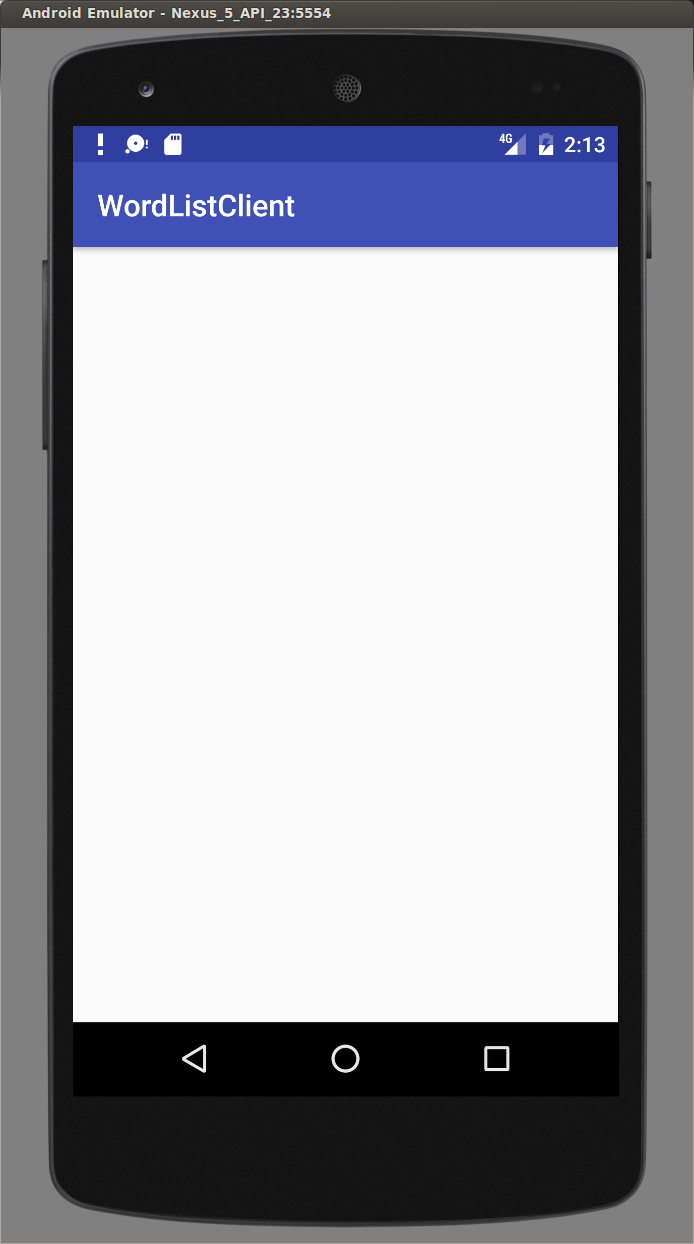
- Run your app, and it should show a blank activity as shown in the following screenshot, since you haven't loaded any data yet. You will add data in the next task.

Task 2. MainActivity: Adding a LoaderManager and LoaderCallbacks
When you use a loader to load your data for you, you use a loader manager to take care of the details of running the loader.
The LoaderManager is a convenience class that manages all your loaders. You only need one loader manager per activity. For example, the loader manager takes care of registering an observer with the content provider, which receives callbacks when data in the content provider changes.
2.1 Add the Loader Manager
- Open MainActivity.java
- Extend the class signature to implement LoaderManager.LoaderCallbacks
. Import the support library version. public class MainActivity extends AppCompatActivity implements LoaderManager.LoaderCallbacks<Cursor> - Implement method stubs for
onCreateLoader(),onLoadFinished(), andonLoaderReset(). - In onCreate(), create a LoaderManager from the support library and register a loader with it.
- The first argument is a numeric tag; since you only have one loader, it doesn't matter what number you choose.
- You are not passing in any data, so the second argument is null.
- And you bind the loader to the current MainActivity (this).
getSupportLoaderManager().initLoader(0, null, this);
2.2 Implement onCreateLoader()
The LoaderManager calls the onCreateLoader() method to create the loader, if it does not already exist.
You create a loader by supplying it with a context, and the URI from which to load data—in this case, for content provider of WordListSQLWithContentProvider, the URI specified in the Contract.
- In onCreateLoader(), create a queryUri and projection. Use the same URI that the content resolver is using to query the content provider. You can find it in the Contract and it is used in WordListClient.
- Create and return a new CursorLoader from these arguments. Import the CursorLoader from the support library.
@Override
public Loader<Cursor> onCreateLoader(int id, Bundle args) {
   String queryUri = Contract.CONTENT_URI.toString();
   String[] projection = new String[] {Contract.CONTENT_PATH};
   return new CursorLoader(this, Uri.parse(queryUri), projection, null, null, null);
}
2.3 Implement onLoadFinished()
When loading has finished, you need to send the data to the adapter.
- Call setData() in onLoadFinished(). The code will turn red, and you will implement it in the next task. The argument for setData() is the cursor with "data" returned by the loader when it is finished loading.
@Override
public void onLoadFinished(Loader<Cursor> loader, Cursor data) {
   mAdapter.setData(data);
}
2.4 Implement onLoaderReset()
On resetting the loader, let the adapter know that the data has become unavailable by passing null to setData().
@Override
public void onLoaderReset(Loader<Cursor> loader) {
   mAdapter.setData(null);
}
Task 3. WordListAdapter: Implement setData(), getItemCount(), and onBindViewHolder()
As your final tasks, you need to implement the setData() method referenced above, and implement onBindViewHolder() to work with the loader to display the data. Here is how this happens:
- When the loader finishes loading new or changed data in the background, the onLoadFinished() method that you implemented in the MainActivity is executed.
- onLoadFinished() calls WordListAdapter.setData(), which updates the mCursor variable in the adapter with the loader's latest data and notifies the adapter that the data has changed.
- The adapter updates the UI with the new data, by binding views to the data in onBindViewHolder().
3.1. Implement setData()
You need a way to set and store the latest loaded version of the data with the adapter. For this app, the loader returns data as a cursor, so you need to create a Cursor member variable mCursor that will always hold the latest data set.
The setData() method is called by the loader when it finished loading or is reset, and it needs to update mCursor.
- Create a private member variable of type Cursor. Call it "mCursor" and initialize it to null.
- Implement the public method setData(). It takes a Cursor argument and returns nothing.
- In the body, set mCursor to the passed in Cursor argument and call notifyDataSetChanged(), so that the adapter updates the display.
public void setData(Cursor cursor) {
   mCursor = cursor;
   notifyDataSetChanged();
}
3.2. Implement getItemCount()
Instead of 0, getItemCount() needs to return the number of items in mCursor. If mCursor is null, return -1.
@Override
public int getItemCount() {
   if (mCursor != null) {
       return mCursor.getCount();
   } else {
       return -1;
   }
}
3.3 Implement onBindViewHolder()
In WordListClient, the onBindViewHolder() method uses a content resolver to fetch data from WordListSQLWithContentProvider's content provider. In this app, onBindViewHolder() uses the data provided by the loader and stored in mCursor.
In onBindViewHolder, handle the following situations.
- If mCursor is null, do nothing, but display a log message. In a real application, you would need to also notify the user in a meaningful way.
- If mCursor is not null but contains no word, set the text of the TextView to ERROR: NO WORD. Again, in a real application, you would handle this depending on the type of app you have.
Otherwise, get the column index for the "word" column (you cannot assume the column is in a fixed location in the cursor's row), and using the index, retrieve the word. Set the text of the text view to the word.
@Override
public void onBindViewHolder(WordViewHolder holder, int position) {

   String word = "";

   if (mCursor != null) {
       if (mCursor.moveToPosition(position)) {
           int indexWord = mCursor.getColumnIndex(Contract.WordList.KEY_WORD);
           word = mCursor.getString(indexWord);
           holder.wordItemView.setText(word);
       } else {
           holder.wordItemView.setText(R.string.error_no_word);
       }
   } else {
       Log.e (TAG, "onBindViewHolder: Cursor is null.");
   }
}
3.4 Run and test your app
Your WordListLoader app should exactly work the same as the WordListClient app for displaying a list of words. To test your app, do the following.
- Make sure WordListSQLWithContentProvder is installed on the device, so that your app has a content provider to load from. Otherwise, your app will display a blank text view.
- Run WordListLoader. You should see the same list of words as in WordListSQLWithContentProvider.
Solution code
Android Studio project: WordListLoader
Summary
- In this chapter, you learned how to use a loader to load data from a content provider that is not part of your app.
Related concept
The related concept documentation is in Android Developer Fundamentals: Concepts.
